
Магнитола сони xr ca665ee схема подключения
Вы публикуете как гость. Если у вас есть аккаунт, авторизуйтесь, чтобы опубликовать от имени своего аккаунта.
Примечание: Ваш пост будет проверен модератором, прежде чем станет видимым.
Последние посетители 0 пользователей онлайн
Объявления
Топ авторов темы
Yuretskok 16 постов
Максимка 20 постов
tilarids 9 постов
Популярные посты

tilarids
24 августа, 2014
Изображения в теме

Завалялись у меня аккумы, решил собрать повербанк. По идее же можно соединить их параллельно ? Мало б/у, на одном 3,921 на другом 4,04.


в кратце, итог все заработало, транзистор взят родной, диод как посоветовали, в разрыв одного провода от ручки газа поставил резистор 3,6 кОм проверил осциллографом скважность до ~50% все заработало, печатается новый корпус под приблуду и радиаторы, хотя нагрева не было от слова совсем за 5 минут работы
@Jekson Если найдете где нибудь поблизости (в установочных аудио студиях к примеру) попользоваться прибором Phonic PAA2 или подобным то сможете отстроить свою домашнюю систему до идеала. Вот для информации нашел почитать.
Давно уже (лет 10-15 назад) проверяли работу автомобильного звукового процессора Audison Bit One в домашней трехполосной системе с поканальным подключением (с настройкой через ноутбук и замерами приборами). Результат был очень достойный. Жаль что с тех времен не сохранились данные на компьютере.
Sony RX100 VII или Sony A6400? Oбзор и сравнение! Sony RX100 VII или iPhone X?
Operating Instructions Руководство по эксплуатации.
Fm / am cassette car stereo, Xr-ca360ee
Руководство по эксплуатации
2003 Sony Corporation
FM/AM
Cassette Car
Stereo
For installation and connections, see the supplied installation/connections
manual.
П орядок установки и подключения магнитолы описан в прилагаемой
инструкции об установке/подключении.
3-257-689-11 (1)

Welcome, Precautions, 2welcome
Thank you for purchasing this Sony Cassette
Player.
In addition to the cassette playback and radio
operations, you can expand your system by
connecting an optional CD/MD unit*
When you operate this unit or a connected
optional CD unit with the CD TEXT function,
the CD TEXT information will appear in the
display when you play a CD TEXT disc*
You can connect a CD changer, an MD changer,
a CD player, or an MD player.
A CD TEXT disc is an audio CD that includes
information such as the disc name, artist name,
and track names.
This information is recorded on the disc.
Precautions
•If your car was parked in direct sunlight
resulting in a considerable rise in
temperature inside the car, allow the unit to
cool off before operating it.
•If no power is being supplied to the unit,
check the connections first. If everything is in
order, check the fuse.
•If no sound comes from the speakers of a
2-speaker system, set the fader control to the
center position.
•When a tape is played back for a long period,
the cassette may become warm because of
the built-in power amplifier. However, this is
not a sign of malfunction.
If you have any questions or problems
concerning your unit that are not covered in
this manual, please consult your nearest Sony
dealer.
To maintain high quality sound
If you have drink holders near your audio
equipment, be careful not to splash juice or
other soft drinks onto the car audio. Sugary
residues on this unit or cassette tapes may
contaminate the playback heads, reduce the
sound quality, or prevent sound reproduction
altogether.
Cassette cleaning kits cannot remove sugar
from the tape heads.

Notes on cassettes
Notes on Cassettes
Cassette care
•Do not touch the tape surface of a cassette, as
any dirt or dust will contaminate the heads.
•Keep cassettes away from equipment with
built-in magnets such as speakers and
amplifiers, as erasure or distortion on the
recorded tape could occur.
•Do not expose cassettes to direct sunlight,
extremely cold temperatures, or moisture.
•Slack in the tape may cause the tape to be
caught in the machine. Before you insert the
tape, use a pencil or similar object to turn the
reel and take up any slack.
•Distorted cassettes and loose labels can cause
problems when inserting or ejecting tapes.
Remove or replace loose labels.
•The sound may become distorted while
playing the cassette. The cassette player head
should be cleaned after each 50 hours of use.
Cassettes longer than 90 minutes
The use of cassettes longer than 90 minutes is
not recommended except for long continuous
play. The tape used for these cassettes is very
thin and tends to stretch easily. Frequent
playing and stopping of these tapes may cause
them to become entangled in the cassette deck
mechanism.

Table of Contents This Unit Only With Optional Equipment Lo.
Table of Contents
This Unit Only
With Optional Equipment
Location of controls . 5
Getting Started
Resetting the unit . 6
Detaching the front panel . 6
Setting the clock . 7
Cassette Player
Listening to a tape . 7
Radio reception during fast-forwarding or
rewinding of a tape
— Automatic Tuner Activation (ATA) . 8
Storing stations automatically
— Best Tuning Memory (BTM) . 8
Storing only the desired stations . 9
Receiving the stored stations . 9
Other Functions
Adjusting the balance and fader . 10
Attenuating the sound . 10
Changing the sound and display settings . 10
Setting the equalizer
Playing a CD or MD . 12
Playing tracks repeatedly
— Repeat Play . 13
Playing tracks in random order
— Shuffle Play . 13
Additional Information
Maintenance . 14
Removing the unit . 15
Specifications . 16
Troubleshooting guide . 17

Location of controls, 5location of controls
Location of controls
Refer to the pages listed for details.
1 SOURCE (Radio/CD/MD) button
2 MODE button
During radio reception:
Band select 8, 9
During CD/MD playback:
CD/MD unit select 12
3 Volume +/– button 7, 10, 11
4 Z (eject) button 7, 8, 9, 12
5 Display window
6 m/M (fast winding)/DIR (tape
transport direction change) buttons 7, 8
7 SEEK button
Seek 9
Automatic Music Sensor 13
Manual search 13
8 DSPL (display mode change) button
9 EQ3 button 11
q; RELEASE (front panel release) button
qa SEL (select) button 7, 10, 11, 12
qs RESET button (located on the front side
of the unit behind the front panel) 6
qd ATT (attenuate) button 10
qf Number buttons 10, 12
During radio reception:
Preset number select 9
During CD/MD playback:
(1) DISC – 13
(2) DISC + 13
(3) REP 13
(4) SHUF 13
qg BTM/ATA button 8
qh SENS button 9
qj OFF button* 6
* Warning when installing in a car
without ACC (accessory) position on
the ignition key switch
Be sure to press (OFF) on the unit for 2
seconds to turn off the clock display after
turning off the engine.
When you press (OFF) momentarily, the
clock display does not turn off and this
causes battery wear.

Getting started, Resetting the unit, Detaching the front panel
Setting the clock
Attaching the front panel
Attach part A of the front panel to part B of
the unit as illustrated and push the left side
into position until it clicks.
Notes
• Be sure not to attach the front panel upside
• Do not press the front panel too hard against the
unit when attaching it.
• Do not press too hard or put excessive pressure
on the display window of the front panel.
• Do not expose the front panel to direct sunlight
or heat sources such as hot air ducts, and do not
leave it in a humid place. Never leave it on the
dashboard of a car parked in direct sunlight or
where there may be a considerable rise in
temperature.
Caution alarm
If you turn the car ignition off without
removing the front panel, the caution alarm
will beep for a few seconds.
If you connect an optional power amplifier and
do not use the built-in amplifier, the beep
sound will be deactivated.
Getting Started
Resetting the unit
Before operating the unit for the first time, or
after replacing the car battery or changing the
connections, you must reset the unit.
Remove the front panel and press the RESET
button with a pointed object, such as a
ballpoint pen.
Note
Pressing the RESET button will erase the clock
setting and some memorised functions.
Detaching the front panel
You can detach the front panel of this unit to
protect the unit from being stolen.
Press (OFF).
Press (RELEASE), then slide the front
panel a little to the left, and pull it off
towards you.
Notes
• Be sure not to drop the panel when detaching it
from the unit.
• If you detach the panel while the unit is still
turned on, the power will turn off automatically
to prevent the speakers from being damaged.
Как впаять aux в любую магнитолу / Aux в Sony, Panasonic, Pioneer и т.д.
AUX выход для магнитолы сони на мой Опелёк
Sony XR-U500 & Sony XR-U800
VovaMasterZvuk Как сделать AUX вход в магнитоле SONY
Add aux port to Sony XR - C550RDS car audio system
Sony Xperia XR Specifications & First 3D Video Rendering Based on Live Image Leaks
Sony Xperia XR leaked
Как включить музыку с телефона в машине без проводов.
Operating Instructions Инструкция по эксплуатации XR.
Fm/am cassette car stereo, Xr-ca665ee
Инструкция по эксплуатации
XR-CA665EE
For installation and connections, see the supplied installation/connections manual.
Перед установкой и подсоединениями прочитайте прилагаемую инструкцию
по установке и подсоединению.
© 2003 Sony Corporation
3-257-843-11 (1)
FM/AM Cassette Car
Stereo

Welcome, 2welcome
Thank you for purchasing this Sony Cassette
Player. You can enjoy its various features even
more with:
• Optional CD/MD units (both changers and
• CD TEXT information (displayed when a CD
is played on a connected optional
CD unit with the CD TEXT function).
• Supplied controller accessory
Card remote commander RM-X114
• Optional controller accessory
Rotary commander RM-X4S
This unit works with Sony products only.
A CD TEXT disc is an audio CD that includes
information such as the disc name, artist name,
and track names. This information is recorded on
the disc.

Table of Contents Location of controls . . . . . . . . . . .
Table of Contents

Location of controls, 4location of controls
Location of controls
Refer to the pages listed for details.
SOURCE (Power on/Tape/Radio/CD/
MD) button
Selecting the source
SEL (select) button
Volume +/– button
Display window
SEEK +/– button
Tape:
Fast-forwarding, reversing a tape Automatic
Music Sensor
Radio:
Tuning in stations automatically/finding a
station manually.
CD/MD:
Skipping tracks/fast-forwarding, reversing a
track.
DSPL (display mode change) button
8, 12, 17, 19
OPEN button 7, 9
Changing the operation
RESET button
(located on the front side of
the unit, behind the front panel)
Number buttons 15, 17
Radio:
Storing the desired station on each number
button.
CD (MP3 files)/MD:
(1)
(eject) button
(located on the front side
of the unit, behind the front panel)
OFF (Stop/Power off) button
Receptor for the card remote
commander
EQ3 button 15, 16
Warning when installing in a car without
an ACC (accessory) position on the
ignition switch
After turning off the ignition, be sure to press
and hold
on the unit until the display
Otherwise, the display does not turn off and this
causes battery drain.
BL SKIP/ ALBM /ATA

Card remote commander rm-x114
The corresponding buttons of the card
remote commander control the same
functions as those on this unit.
DSPL button
MENU button
SOURCE button
SEEK (+/–) buttons
SOUND button
VOL (+/–) buttons
MODE button
LIST button
DISC/PRESET (+/–) buttons
ENTER button
Not available for this unit
Note
If the display disappears by pressing
be operated with the card remote commander unless
on the unit is pressed, or a cassette tape is
inserted to activate the unit first.
Tip
Refer to “Replacing the lithium battery” for details on
how to replace the batteries (page 21).
Card remote commander RM-X114

Precautions, Notes on cassettes, Precautions notes on cassettes
Precautions
• If your car was parked in direct sunlight, allow
the unit to cool off before operating it.
• If no power is being supplied to the unit, check
the connections first. If everything is in order,
check the fuse.
• If no sound comes from the speakers of a 2-
speaker system, set the fader control to the
centre position.
• When a tape is played back for a long period,
the cassette may become warm because of the
built-in power amplifier. However, this is not a
sign of malfunction.
If you have any questions or problems
concerning your unit that are not covered in this
manual, please consult your nearest Sony dealer.
To maintain high quality sound
Be careful not to splash juice or other soft drinks
onto the unit or tapes.
Notes on Cassettes
Cassette care
• Do not touch the tape surface of a cassette, as
any dirt or dust will contaminate the heads.
• Keep cassettes away from equipment with
built-in magnets such as speakers and
amplifiers, as erasure or distortion on the
recorded tape could occur.
• Do not expose cassettes to direct sunlight,
extremely cold temperatures, or moisture.
• Slack in the tape may cause the tape to be
caught in the machine. Before you insert the
tape, use a pencil or similar object to turn the
reel and take up any slack.
• Distorted cassettes and loose labels can cause
problems when inserting or ejecting tapes.
Remove or replace loose labels.
• The sound may become distorted while playing
the cassette. The cassette player head should be
cleaned after each 50 hours of use.
The use of cassettes longer than 90 minutes
is not recommended except for long
continuous play
The tape used for these cassettes is very thin and
tends to stretch easily.
Frequent playing and stopping of these tapes
may cause them to become entangled in the
cassette deck mechanism.

Getting started, Resetting the unit, Detaching the front panel
Resetting the unit detaching the front panel
Getting Started
Resetting the unit
Before operating the unit for the first time, or
after replacing the car battery or changing the
connections, you must reset the unit.
Remove the front panel and press the RESET
button with a pointed object, such as a ballpoint
pen.
Note
Pressing the RESET button will erase the clock setting
and some stored contents.
Detaching the front panel
You can detach the front panel of this unit to
protect the unit from being stolen.
Caution alarm
If you turn the ignition switch to the OFF
position without removing the front panel, the
caution alarm will beep for a few seconds.
If you connect an optional amplifier and do not
use the built-in amplifier, the beep sound will be
deactivated.
Tape playback or radio reception stops (the
key illumination and display remain on).
If your car has no ACC position on the ignition
switch, be sure to turn the unit off by pressing
until the display disappears to avoid car
battery drain.
, then slide the front
panel to the right, and gently pull out
the left end of the front panel.
Notes
• If you detach the panel while the unit is still turned
on, the power will turn off automatically to prevent
the speakers from being damaged.
• Do not drop or put excessive pressure on the front
panel and its display window.
• Do not subject the front panel to heat/high
temperature or moisture. Avoid leaving it in a parked
car or on a dashboard/rear tray.
Tip
When carrying the front panel with you, use the
supplied front panel case.
Схема подключения автомагнитолы Sony подразумевает правильность действий, знание предназначения коннекторов и многое другое. В этой статье будет рассказано, как осуществить установку и подключение автомагнитол этой фирмы. Автомагнитолы Sony и схема подключения разъемов – это все, что нужно для грамотного проведения процесса.
Подключение
Составляющих для подключения автомагнитол бывает несколько. Рассмотрим их.
Коннекторы
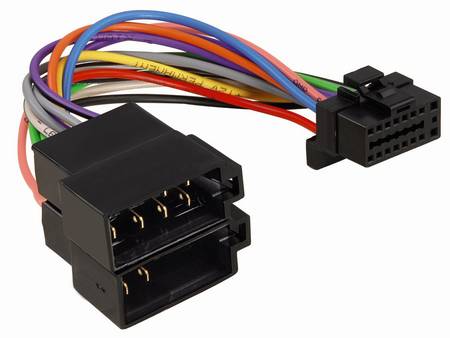
В первую очередь важными составляющими при подключении являются разъемы или коннекторы. Они могут быть индивидуального свойства или ISO, то есть сделанные по международному стандарту.
Различия между ними в следующем:
- Если коннекторы(см.Коннектор для акустического кабеля и зачем он нужен) индивидуальные, то к ним надо подбирать переходник ISO или обрезать провода, а затем соединять их с колодкой индивидуального коннектора по схеме.
Примечание. С другой стороны, обрезать провода и осуществлять подключения описанным выше способом крайне не рекомендуется. Будет лучше использовать термоусадочные кембрики и другие меры предосторожности.
- Что касается разъемов ISO, то они намного удобнее. Если автомагнитола Сони наделена ими, то подключение ее будет минутным делом.
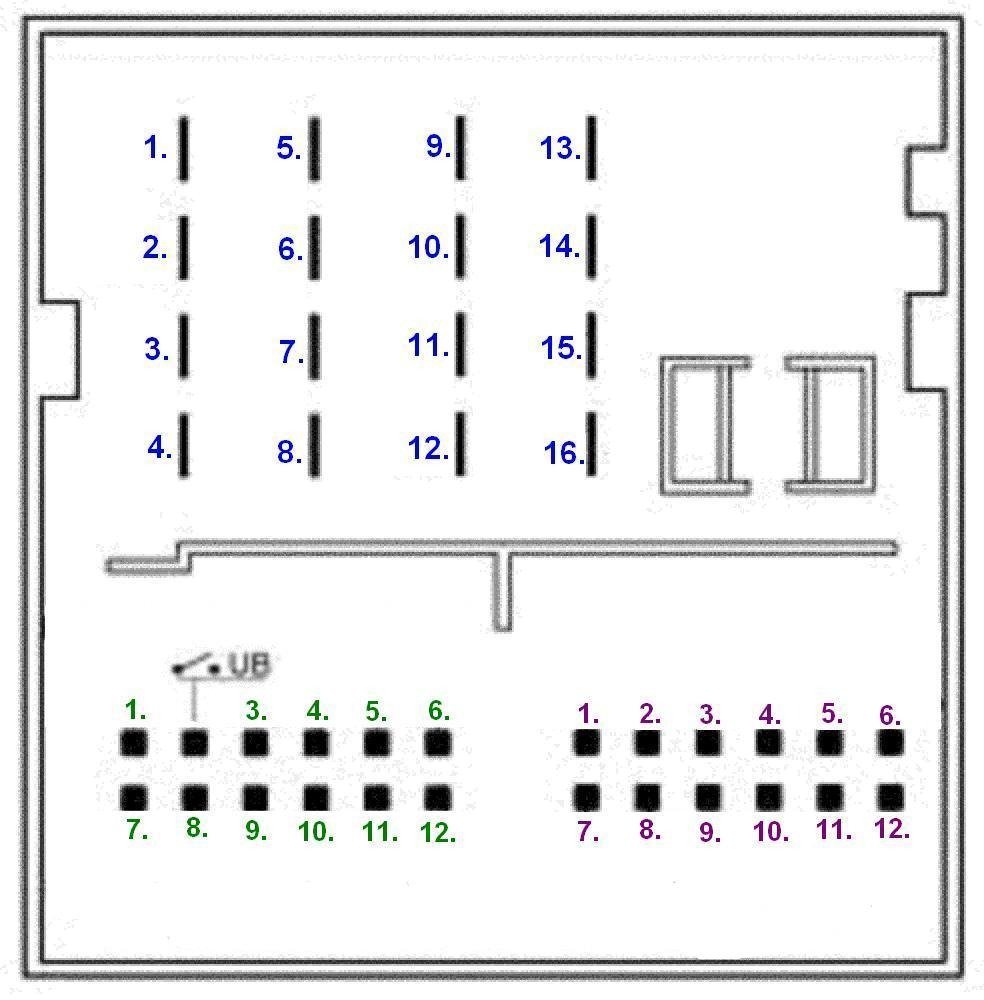
Распиновка разъемов автомагнитол sony
Провода
Правильно подцепить плюсовой провод, также очень важно. Если соединять автомагнитолу Sony напрямую от АКБ, нужен обязательно предохранитель. Крайне важен в этом случае и диаметр проводки, который не должен быть меньше разъема головного устройства.
Примечание. В крайнем случае автомагнитолу подключают и через прикуриватель.
Для уменьшения утечки энергии с АКБ, подключение осуществляется по следующей схеме:
В данном случае:
- Кабель черного цвета, идущий от АКБ, это масса;
- Кабель желтого цвета, идущий от АКБ – силовой или плюсовой на 12 В;
- Кабель красного цвета отвечает за сигнал на включение головного устройства от ЗЗ*;
- Наконец, синий провод – это антенна или другие устройства.
Примечание. Что касается диодов, то можно ставить любые типа КД522Б.
*ЗЗ – замок зажигания
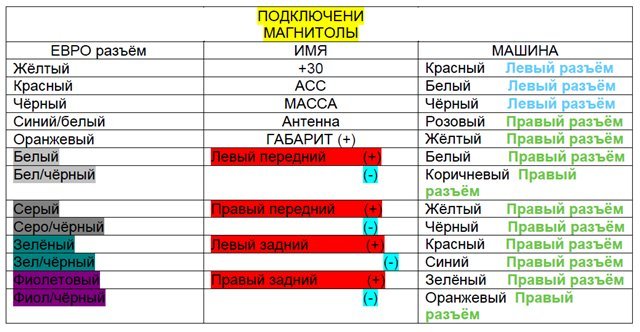
Разъем для автомагнитолы sony и распиновка по цветам
Провода при подключении автомагнитолы должны располагаться по следующей схеме:
- Желтый силовой провод всегда отвечает за питание головного устройства, его память. В первую очередь его надо подать в качестве плюса;
- Красный провод тоже силовой, но он отключает работу головного устройства. Его тоже надо подавать.
Примечание. Инструкция гласит, что красный провод обязательно должен быть подключен через замок зажигания, чтобы головное устройство отключалось после того, как будет повернут ключ зажигания.
Плюсовые провода зачастую соединяют вместе. Они скручиваются и подключаются к постоянному току,но это делать не рекомендуется.
Дело в том, что в таком случае головное устройство будет работать постоянно, вне зависимости от того, повернут ключ в зажигании или нет. В свою очередь это грозит обесточиванием АКБ за считанные промежутки времени,особенно когда машина стоит.
Если автомагнитола Сони подключается к вазовским моделям, то можно осуществить процесс следующим образом:
- Подключить красный провод не к замку зажигания, а на 5-й контакт колодки БСК.
Такая схема оригинальна, но имеет недостатки. Так, если в машине остается пассажир на время, то приходится оставлять с ним ключ зажигания, чтобы он слушал музыку. Кроме того, такая схема потребляет намного больше электроэнергии.
Три сценария подключения
Принципиальная схема автомагнитол sony cdx
Наиболее правильная схема подключения автомагнитолы Сони может выглядеть тремя способами.
Обычная кнопка
- Подключение через кнопку, которая ставится на кабель красного цвета ГУ. Она обычная — вкл/выкл.
При таком подключении ГУ работает постоянно, а если автомобиль стоит длительное время, можно просто нажать на кнопку и прекратить питание с АКБ.
Аварийка
В данном случае подразумевается не обычная кнопка, а аварийка автомобиля:
- При задействовании – идет питание на ГУ через постоянный плюс;
- Если кнопка не нажата, то питание на ГУ идет через красный кабель от ЗЗ.
Схема будет выглядеть в этом случае следующим образом:
- У автомагнитолы Сони имеется провод подсветки, который соединяется с подсветкой прикуривателя;
- Плюс после зажигания идет с колодки часов;
- Постоянный ток подается с АКБ или прикуривателя;
- Черный провод массы протягивается тоже с прикуривателя.
Через соленоид
Если в автомобиле имеется 2-х проводной соленоид, который срабатывает на закрытие/открытие путем изменения полярности, то схему можно устроить так:
- Когда открываются двери авто, положительный импульс подается на реле Р1 с соленоида. Оно срабатывает и начинает брать питание с АКБ через выводы своих контактов и реле Р2, таким образом, подключая ГУ к питанию;
- Во время закрытия происходит срабатывание реле Р2 и цель питания обрывается, ГУ отключается.
Схема с большим количеством минусов. Повышенное потребление тока за счет дополнительного реле.
Наладка неправильного подключения
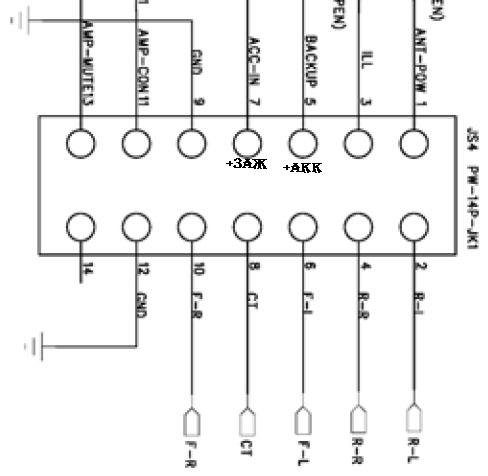
Распиновка разъема автомагнитолы
- С АКБ скидывается масса, чтобы во время копания в проводке не закоротить случайно;
- Отдергивается вставка на коробе центральной панели и тянется с передней части вверх;
- Выворачиваются шурупы, находящиеся над консолью управления климат-контролем (по крайней мере, так на многих иномарках седанах);
- Снимается пепельница;
- Лицевая панель автомагнитолы Сони выводится из креплений, а после убирается в сторону;
- 4 винта, фиксирующие центральные блоки, выворачиваются;
- Автомагнитола вынимается.
- За магнитолой куча проводов, которые надо изучить по схеме подключения ГУ с АСС (смотрим выше);
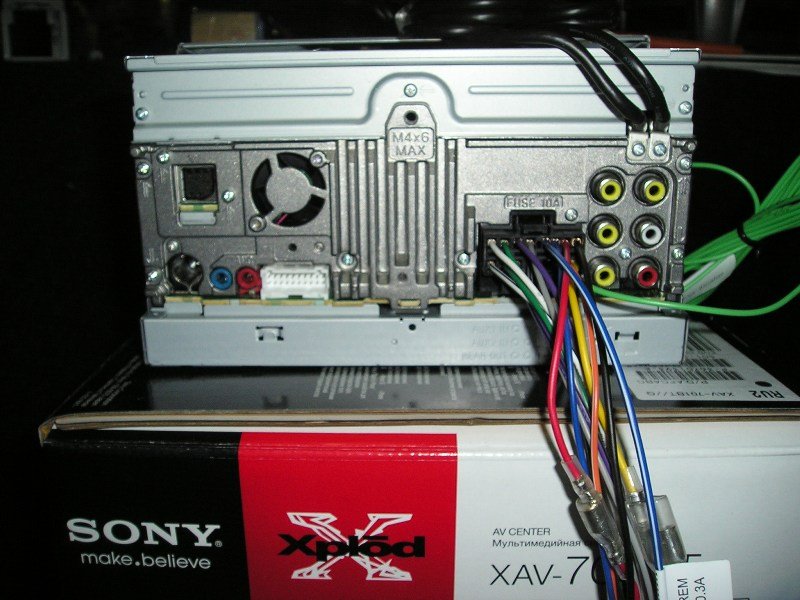
Проводка
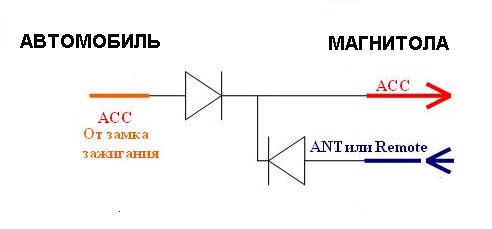
Схема подключения sony автомагнитолы
- Кроме того, надо изучить и то, какой провод, куда идет;
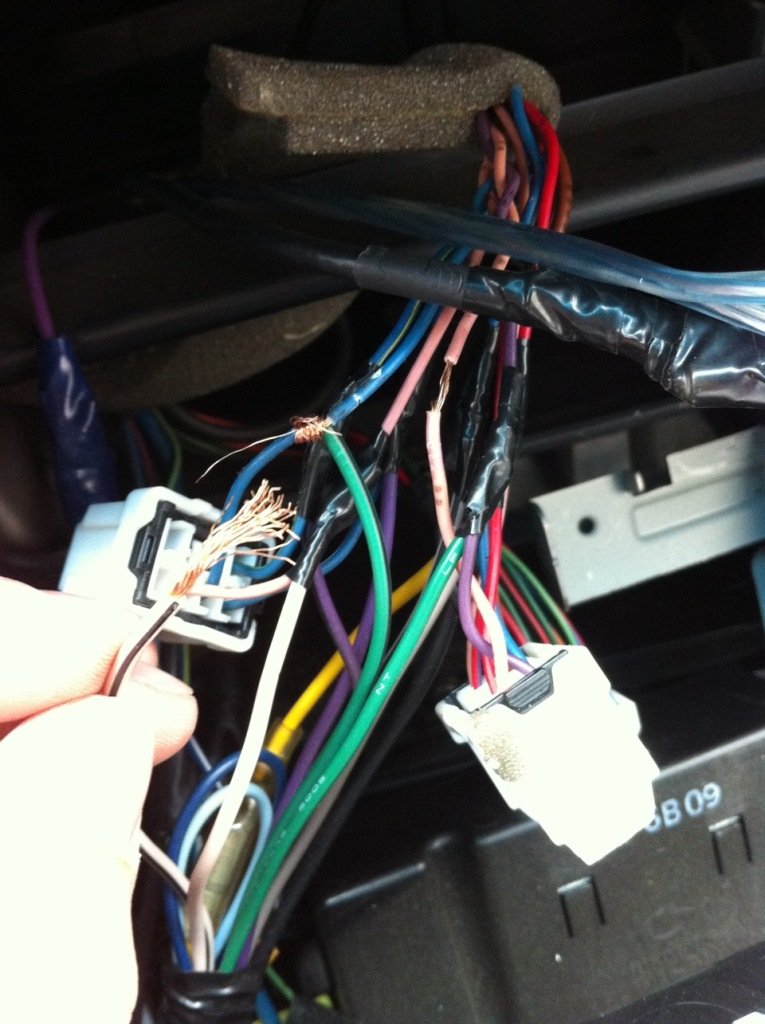
Провода автомагнитолы Сони
- Обратить внимание надо и на то, что магнитола подключена 2-я проводами на плюс: один из проводов желтый, а другой красный. Они соединены вместе и подключены к постоянному току, в обход замку зажигания, как здесь;
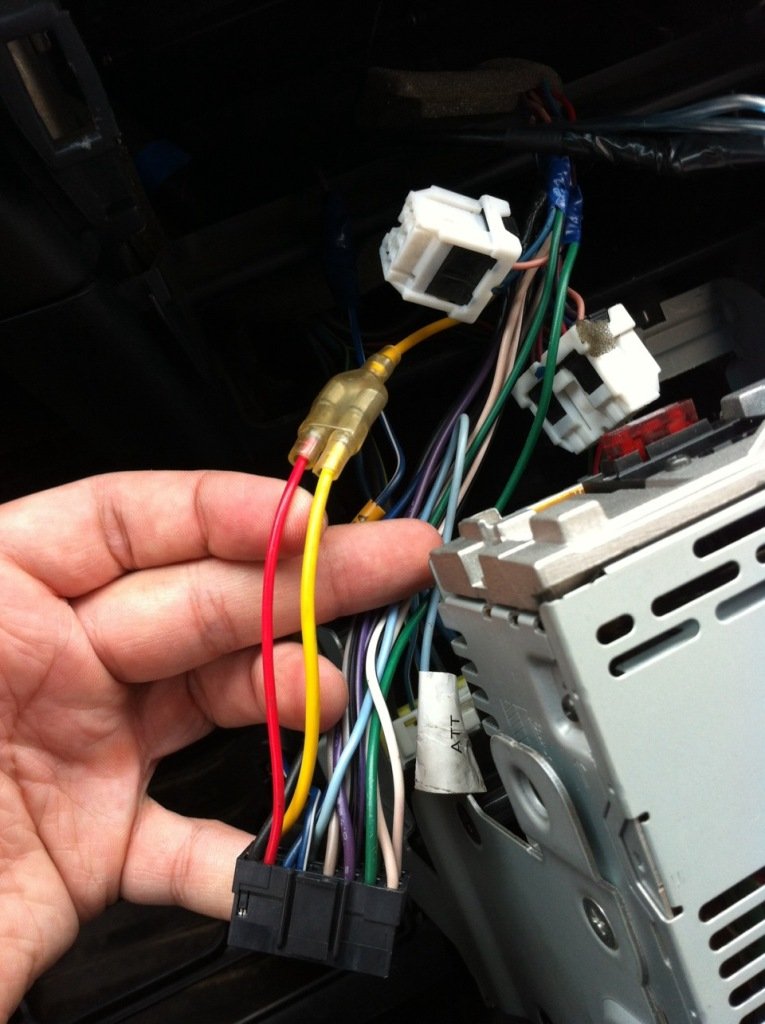
Желтый и красные провода вместе
Примечание. Как правило, черный провод отвечает за массу, коричневый или желтый – за постоянное питание, розовый с синей полоской – за питание от замка. Остальные провода идут на переднюю акустику.
- Рвется красный провод, а изоляция с провода с синей полоской откручивается. Два провода скручиваются вместе и изолируются;
- Все провода сматываются обратно. Не забываем поменять местами белый и зеленый провода, идущие на динамики;
- ГУ подключается и все проверяется так: если ключ в замке в положении 1 – магнитола отключена, если ключ замка в положении АСС – магнитола включена.
Примечание. Резать провода надо с термоусадками. В процессе данной операции можно отрегулировать заодно пульт управления на басовик сзади. Достаточно будет вытащить подстаканник, а провод на сабвуфер провести под ним. Вот и все дела.
Теперь, дорогой читатель, ты знаешь, что означают все тонкости подключения магнитолы, по крайней мере, теоретически. Что касается практики, то не надо спешить к ней приступать, пока не будет просмотрен видео обзор в тему, подробно изучены схемы и фото – материалы.
При работе своими руками надо не забывать, что провода должны быть хорошо заизолированы. Самостоятельная наладка проблем и умение подключать автомагнитолу – ценная штука.
Теперь можно сэкономить на расходах, которые неизбежны при вызове специалиста, цена услуг которого порой вызывает недоумение у большинства россиян.
Григорий с детства обожал машины, а в подростковом возрасте, когда самостоятельно подключил автомагнитолу в отцовской девятке, понял, что машины будут его работой, хобби, призванием.
Читайте также: