
Схема подключения сигнализации мангуст киборг
Connect to +12V contact of the car battery via 5A fuse.
Built in Relay Contact.
Connect to the right side indicators feed wire.
Connect to +12V contact of the car battery via 15A fuse. (In case of negative
polarity of the Indicator control wire connect to the car body via 15A fuse).
Built in Relay Contact.
Connect to the left side indicators feed wire.
Unlock Normally Closed Contact
Unlock Common Contact
See Central Door Lock Connection Diagrams
Unlock Normally Opened Contact
Lock Normally Closed Contact
Lock Common Contact
Lock Normally Opened Contact
Power Trunk Release Output +10A
Connect to the positive trunk release line. Install a trunk release actuator if there
is no OE actuator.
Connect to the car body.
Negative Trunk Trigger Input
While remote trunk opening in armed stage the input will be overridden
until 10 seconds of trunk is closed.
The trunk pin switch should be mounted onto the car body metal. Make sure the
switch is reliable disconnected when the trunk cowl is closed, and will be
grounded as soon as the trunk is opened.
Negative Central Door Lock Control Brown/Black
Connect to the master actuator output, which is grounded in “open” position and
Input One of two options can be
stays free in “closed” position.
selected for this input with the
Installer Function 3 4.
1. CDL Control Input.
2. CDL Control Input with arming
on locking.
Negative Hood Trigger input
The hood pin switch should be mounted onto the car body metal. Make sure the
switch is reliable disconnected when the hood is closed, and will be grounded as
soon as the hood is opened.
Negative Door Trigger Input
The input has the “Dome Light Cars” selectable option.
(Installer function 1 2).
Programmable Control Input 2
The input can be adjusted to operate as:
The mode of the input operation is
1. Low Fuel Warning. Connect to the Low Fuel Control Lamp.
set by the Installer’s function 1 5.
As soon as the lamp is switched on all remote and automatic start operation
Polarity of the input operation is set
will be forbidden by the system. The LCD will display the Low Fuel Indicator until
by the Installer’s function 1 6.
the first switching the ignition on with normal fuel level.
2. Glow Plug Monitor. Connect to the Glow Plug wire. The system will monitor
the glow plug status and will crank the engine as soon as glow plug is switched
off, but not later than in 1 minute. This mode is only available when
the Installer’s function 2 5 set to Diesel Mode.
Programmable Control Input 1
The input can be adjusted to operate as:
The mode of the input operation is
1. Overheating Protection. If a vehicle includes an Overheating Control Lamp,
set by the Installer’s function 1 3.
connect to this lamp.
Polarity of the input operation is set
2. Generator/Oil Lamp Monitor. Connect to Generator or Oil lamp if
by the Installer’s function 1 4.
generator/oil lamp monitoring of engine running/started is selected with programming.
Connect to the handbrake switch.
Positive Programmable Input
1. Positive Door Trigger Input.
The mode of the input operation is
2. Shining Light Warning. (Connect to the Parking Lights Feed Wire).
set by the Installer function 1 1.
Cut the starter wire on the ignition key and connect the light blue wire to the key
side of the starter wire. Connect the Black/yellow starter power output wire to
the motor side of the starter wire. Such connection will allow both blocking the
starter when armed and anti grinding protection after remote or automatic start.
RPM Control Input
If RPM monitoring of engine running/started is selected connect the RPM
signal circuit. Fulfill the RPM Leaning in the Installer’s function 2 7.
Wire Destination
24 pin Connector
Автомобильная охранная система “MONGOOSE” Модель CYBORG START
СХЕМА ПОДКЛЮЧЕНИЙ

Cyborg start, Схемы подключения к центральному замку
Two Way Car Alarm System MONGOOSE CYBORG START
Start the engine using the ignition key and the alarm system will monitor the Engine RPM
When the engine has reached the idle speed, press button 3 within 3 seconds of pressing
button 5 to start the idle frequency learning.
The system will monitor the engine RPM signal for 3 seconds and save the average
frequency during this period as the idle frequency.
Once the RPM Signal has been learnt, the system will automatically exit learning mode
beeping the siren unit and flashing the indicators 3 times to indicate that the RPM signal
has been learnt. The system will return to the Installer Software Switch Table at
switch 2 7 RPM Learning (you can use the override switch to move up and down the
installer switches as normal)
If the you tried to start the car during RPM learning mode and the engine does not start,
then the 1 minute learning timer will be reset when the starter motor is switched off.
If the system remains in learning mode for 1 minute without a (a further) attempt to start
the vehicle being made, the system will exit RPM learning mode, beep the siren and flash
the indicators 4 times and return to Installer Software Switch 2 7 RPM Learning.
If the system reads an engine RPM signal but is unable to learn the frequency of the signal,
the system will exit learning mode 1 minute after the engine was started and return to
Installer Software Switch 2 7 RPM Learning beeping the siren and flashing the indicators
5 times to indicate that the signal could not be learnt.
RPM Remote Start cannot be used unit an Idle Engine RPM signal has been taught to the
system – i.e. you must select Installer Software Switch 2 7 RPM Learning and complete the
procedure above with a 3 flash/3 beep confirmation being given by the system before Remote
Start will function.
After the RPM Leaning has been completed the Voltage sensing and the Generator/Oil
Lamp Sensing will be unavailable until the RPM Learning is canceled.
Canceling of the RPM Learning:
1. Select Installer Software Switch 2 7 RPM Learning.
2. Press buttons 1 and 2 together to enter the RPM learning mode and start the 1 minute
3. The siren will beep 3 times and the indicators will flash 3 times.
4. Press buttons 1 and 2 together once again.
5. The siren will beep 2 times.
6. The RPM Learning is now canceled and RPM sensing is unavailable. You can use either

The basic procedure is the same regardless of single digit pin code or two digit pin code. If the
system has a single digit PIN code, follow steps 1 2 but skip steps 3 4. If the system has a two digit
PIN code follow the entire procedure.
1. When the alarm system is disarmed turn the ignition on.
2. Press the override switch as many times as the first digit of the PIN code.
3. Cycle the ignition off/on.
4. Press the override switch as many times as the second digit of the PIN code.
5. Switch the ignition off. If the PIN code is correct one short and one long beep will confirm
entering the Code Learning.
6. Switch the ignition on.
7. Press button 1 of each remote control you want to program to the system. One siren beep
will confirm the transmitter code is learnt. When you are programming a two way transmitter
please wait a few seconds after the beep until the indicator icon on the LCD screen is
flashing two times to confirm the main unit code has been programmed to the transceiver,
otherwise the pager function will not work.
8. To exit the Code Learning switch the ignition off and press the override switch or wait for
15 seconds, a double siren beep will confirm that Code Learning has exited. NOTE: If you
want to move to the Function Programming switch the ignition back on without pressing
the override switch and before the double siren beep.
Function programming.
1. Follow through with transmitter programming and turn the ignition back on (do not press
the override switch in the above item 8!).
2. Press the override switch 4 times
3. Cycle the ignition off/on.
4. Press the override switch 6 times.
5. Press buttons 1 and 2 together. An audible signal will confirm the system has entered the
Installer’s Function Programming.
6. Turn the ignition off/on.
7. Press the override switch as many times as the number of the software switches group (first
8. Turn the ignition off/on.
9. Press the override switch as many times as the number of switch within the group (second

beeping the siren unit and flashing the indicators 3 times to indicate that the RPM signal
has been learnt. The system will return to the Installer Software Switch Table at
switch 2 7 RPM Learning (you can use the override switch to move up and down the
installer switches as normal)
If the you tried to start the car during RPM learning mode and the engine does not start,
then the 1 minute learning timer will be reset when the starter motor is switched off.
If the system remains in learning mode for 1 minute without a (a further) attempt to start
the vehicle being made, the system will exit RPM learning mode, beep the siren and flash
the indicators 4 times and return to Installer Software Switch 2 7 RPM Learning.
If the system reads an engine RPM signal but is unable to learn the frequency of the signal,
the system will exit learning mode 1 minute after the engine was started and return to
Installer Software Switch 2 7 RPM Learning beeping the siren and flashing the indicators
5 times to indicate that the signal could not be learnt.
RPM Remote Start cannot be used unit an Idle Engine RPM signal has been taught to the
system – i.e. you must select Installer Software Switch 2 7 RPM Learning and complete the
procedure above with a 3 flash/3 beep confirmation being given by the system before Remote
Start will function.
After the RPM Leaning has been completed the Voltage sensing and the Generator/Oil
Lamp Sensing will be unavailable until the RPM Learning is canceled.
Canceling of the RPM Learning:
1. Select Installer Software Switch 2 7 RPM Learning.
2. Press buttons 1 and 2 together to enter the RPM learning mode and start the 1 minute
3. The siren will beep 3 times and the indicators will flash 3 times.
4. Press buttons 1 and 2 together once again.
5. The siren will beep 2 times.
6. The RPM Learning is now canceled and RPM sensing is unavailable. You can use either
Mongoose cyborg была выпущена отдельно, из-за возросшей потребности в устройствах такого класса. Ничего принципиально нового пользователи не увидели, но модель Mongoose Cyborg удовлетворила все их потребности.
Даже мощные помехи большого города не глушат сигнал передатчика, который, к тому же, обладает большим радиусом связи.
Весь функционал охранной системы mongoose cyborg реализован на высшем уровне, благодаря стараниям разработчиков, устройство работает по совершенно новым алгоритмам кодирования сигнала. Система рассчитана устанавливаться на автомобили высшего и среднего ценового сегмента, при этом стоимость модели не высока, в результате, спрос превысил любые ожидания.
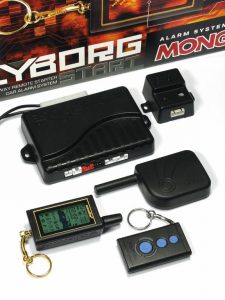
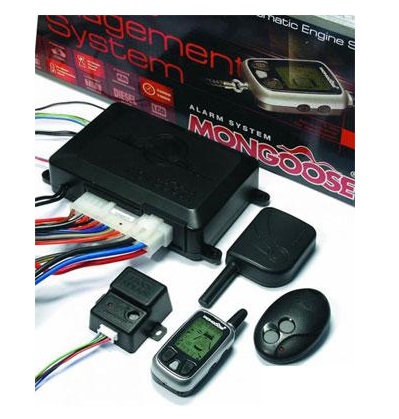
Комплект поставки
По традициям, формировавшимся годами, торговая марка Mongoose Cyborg не изменила своим убеждениям и создала отличное устройство, способное гарантировать стопроцентную защиту любого транспортного средства от несанкционированного доступа и угона.
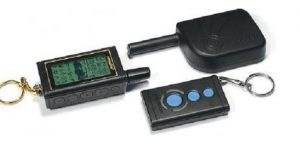
- брелок двухстороннего типа со встроенным четырехканальным пейджером, дисплеем светодиодного типа для индикации событий, звуковым оповещением и четырьмя клавишами управления (каждое нажатие сопровождается звуком);
- головное устройство;
- модуль радиоканала;
- главный брелок двухстороннего типа со многоканальным пейджером, жидкокристаллическим экраном для индикации различных событий, динамиком, вибросигналом и пятью управляющими кнопками, нажатие которых сопровождается звуковыми сигналами;
- брелок одностороннего типа с тремя управляющими клавишами;
- датчик удара работающий по двухуровневой технологии;
- главный светодиод – индикатор;
- клавиша аварийного отключения защитной системы;
- комплект проводки для подключения системы;
- комплект для монтажа;
- инструкция по эксплуатации;
- инструкция по установке;
Функционал защитной системы Mongoose Cyborg
Большинство автомобилистов предпочитают пользоваться охранной системой Mongoose для своей машины.
Аргументируя это тем, что она имеет легкое управление, быстрый монтаж, отличное качество и доступную стоимость.
Сигнализация данной фирмы содержит множество моделей. Подробно разберем некоторые из такого большого перечня.
Мongoose ems 7.0

Мongoose ems 7.0 – охранная система, которая предназначена для всесторонней защиты автомобиля. Управление данной сигнализацией осуществляется дистанционным и автоматическим запуском двигателя. Для отображения опасности имеется звуковая и световая сигнализация.
Сигнал об опасности с помощью радиосигнала отправляется на пейджер, который находится в пульте от сигнализации. Также данная модель предотвращает, неразрешенное владельцем, запускание двигателя.
Существенно упрощает пользование системой сигнализации Мongoose EMS 7.0 – автозапуск. Он дистанционно может включить сигнализацию или осуществить запуск двигателя.
Происходит это автоматически, всего лишь нужно определиться со временем и периодичностью. Система предназначена для работы на машинах с любыми двигателями и коробками передач. Запуск двигателя проводится совершенно безопасно.
Для того чтобы никто не смог попасть в систему заранее продумана защита кода радиокоманд. Она сможет предотвратить любые попытки перехвата кодов. Имеется в наличии функция антисканирования, которая необходима для защиты от отключения сигнализации с помощью подбора любых кодов. Еще в наличии есть функция памяти состояний. Благодаря ей злоумышленник не сможет снять машину с сигнализации с помощью прикрепления клеммы автомобильного аккумулятора. В результате машина просто вернется в режим, который был задан ранее и двигатель будет заблокирован.
Мongoose ems 1.7
Если после снятия с охраны машины не прошло никаких дополнительных действий, которые обозначат, что это сделал именно владелец транспорта, то на брелок поступит сигнал об угрозе угона и сработает сигнализация. Также есть возможность выставить постоянный съем автомобиля с защиты в одно и то же время, без участия в этом пульта.
Мongoose ems 1.9
Мongoose ems 1.9 – автомобильная системы охраны, в комплект которой входит управление запуском двигателя.
Это означает, что она помогает не только предотвратить угон автомобиля, но и также запустить двигатель в любое удобное время. Данная функция помогает существенно сэкономить время в зимнее время года.
Самый большой плюс Мongoose ems 1.9 – схема подключения. Монтаж осуществляется легко, подключение системы не требует особых знаний. Инструкция прилагается и в ней рассказывается, как правильно настроить сигнализацию и активировать все необходимые функции. Купить данную систему охраны не составит труда, так как фирма известная и стоимость доступная.
Читайте также: